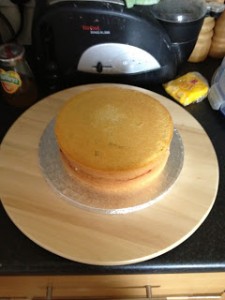
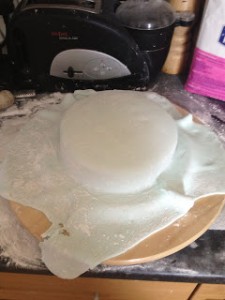
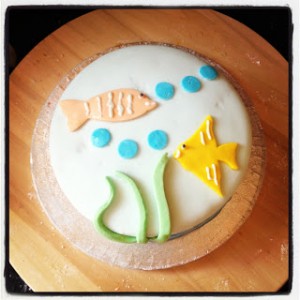
After making my Nan’s birthday cake and it going down a storm, I was asked to make my Granddad’s cake. They said they didn’t mind what I decided to do, design wise, so I decided to go for a fish theme as my Granddad loves fishing. I made a plain Victoria sponge and then iced it in regal ice. I then made seaweed, bubbles and fish for decoration. The Victoria sponge was amazing, honestly the best recipe I’ve found, it’s really light, yet moist and has a yummy vanilla flavour.
I’ve been reading up on Swiss Meringue Buttercream so I really want another birthday cake to make soon so I can give it a go!
You will need:
> 2 7″ sandwich tins
> Cake leveller
> Piping bag & small plain nozzle
> Pastry brush
> 1tbsp Apricot jam + 1tbsp water to brush on the cake before icing
> Royal icing to stick decorations on
> 750g regal ice (I bought white and then coloured it myself, you can buy coloured if you’d rather)
> Gel food colours
> Icing sugar to dust
> Rolling pin
> Cake board
> Ribbon (optional)
> Various cookie cutters (optional)
> Pizza cutter/sharp knife to cut excess icing off
> Fondant smoother
Makes 2 7″ layers
From Step-by-Step Baking
Ingredients:
> 175g butter/marg
> 175g caster sugar
> 3 eggs
> 1tsp vanilla extract
> 175g self-raising flour
> 1tsp baking powder
> Jam of your choice for filling (I used Strawberry)
> Buttercream to fill – This is the only time I ever buy ready to spread icing, merely because it means the cake doesn’t have to be put in the fridge when it’s finished. If I was serving straight away I would make my own buttercream, but I had to drive it half way across the country so ready to spread was the way to go.
If you want to make your own buttercream then it’s:
> 50g butter
> 100g icing sugar
> 1tsp vanilla extract (optional)
Method:
> Preheat the oven to 180 degrees C and grease the sandwich tins.
> Place the butter and sugar in a large bowl and beat together until light and fluffy.
> Add in the eggs, one at a time, mixing well, between additions to avoid curdling.
> Add in the vanilla extract and mix briefly.
> Sift in the flour and baking powder and mix until well incorporated. Mixture should be light and smooth.
> Now to split the mixture between the two tins. To ensure I get an even amount in each one, I use a spatula and put one dollop in one tin, then one in the other and repeat this until the mixture is gone. Usually about 4 1/2 dollops in each.
> Smooth the mixture over a little, but don’t worry too much as it will level off in the oven.
> Bake in the oven for 20-25 minutes until golden brown and an inserted skewer comes out clean.
> Leave to cool in the tin for 20 minutes and then turn out onto a wire rack to cool completely.
> You can wrap the layers in clingfilm and put them in the fridge overnight if you want, but I decorated mine the same day.
> To level off the cakes, either use a serrated knife or a cake leveller. I used a cake leveller, it has been a godsend in my kitchen!
> Place one of the cakes on the cake board, bottom down. Spread a layer of buttercream over the cake. (If making your own beat the sugar, (vanilla extract) and butter together until light and fluffy).
> On top of the buttercream, spread jam of your choice on top. Place the top layer bottom up on top of the jam. Bottom up because the bottom is guaranteed to be level.
> Knead the icing for a bit to make it pliable. I dyed mine pale blue by adding a small amount of gel colouring and then kneading it through the icing very thoroughly.
> Dust the worktop with icing sugar and roll out the icing. I don’t like thick layers of icing so mine was probably only a few mm thick. This means there’s plenty left for making the decorations.
> Place 1tbsp of apricot jam and 1tbsp of water in a saucepan and heat up until it starts to bubble.
> Brush the jam all over the cake, top and sides, with the pastry brush.
> Ensure your regal ice is well powdered and then roll it around the rolling pin loosely. I couldn’t get a picture of this as I was home alone and using both hands to hold the icing!
> Lay the icing over the cake, unrolling it as you go across the cake. Make sure there is a good border around the cake so it covers the sides. Using, the fondant smoother go over the top of the cake and around the edges, making sure it’s nice and smooth and remove any folds by stretching them and smoothing them again.
> Using a pizza cutter, or sharp knife cut around the bottom of the cake to remove the excess icing.
> Save the excess icing to make the decorations.
> Now I stick my ribbon on. Make up the royal icing. I do this by eye, just add a couple of tbsp of royal icing to a bowl and then a tiny amount of water, then I mix it until it’s thick and smooth and able to be piped.
> Place the royal icing in the piping bag and pipe a bit of royal icing onto the end of the ribbon. Place this at the bottom then, every so often as you go around the cake put a bit of royal icing on the ribbon. An icing turntable is a godsend here as otherwise you have to stop and turn the cake. When you get back to the beginning of the ribbon, place a bit more royal icing on the end and stick down, I always make sure there’s a little bit of overlap as it looks neater.
> Now for decorations! It’s good to have a plan of what you want and where you want it, either jotted down or in your head. I wanted two fish, with bu
bbles and some seaweed.
> Cut decorations out and stick them down with the royal icing.
> I then coloured the royal icing pale green to pipe details onto the fish.
> I also dyed a tiny amount of regal ice black and made eyes for my fish.
> Here’s the finished product 🙂

