The first in my new series “Photography SOS” – everyone needs a really simple guide to using their camera!
Hello friends and welcome to the first in a new photography series on Annie’s Noms!
Thinking about making the step into dSLR photography? Or, have you just become the proud owner of one, but are now driving yourself crazy trying to understand all the buttons?
If so, then read on!
Now, I am no expert. 2 years ago I could barely switch a dSLR on myself, let alone shoot in Manual mode and take RAW images, but it is possible to learn and once you get the hang of it, it’s really pretty simple.
Well, I say simple, but that does depend on what you read because I have read some articles/how-to’s and been left feeling more confused than when I started. Not great, when you’re a novice photographer.
But, I understand that, because I was there, so if I can help one person get started on their dSLR journey, then it will be job well done as far as I’m concerned!
Today’s post probably won’t be for everyone. When I do something, I do it thoroughly, so I’m starting at the very beginning for people who, like me, have/had no clue about cameras. Next week I’ll be going into different modes on your camera and starting to go over shooting photos!
Do you want to know something funny? Before I started my blog, my Dad got this (IMO at the time) snazzy Canon camera and he tried to explain what it was and what it could do. I looked at it, turned it on and then turned it off because I saw all the symbols and numbers on the screen and wanted to run and hide.
Now, I’m actually an employed food photographer… and I have to pinch myself every single day.
The main goal of this series is to show you in plain English what things mean and how to use your camera. I sometimes still get a little confused by f/stops and the numbers going up or down, but with the use of some graphics and no confusing jargon I’m going to walk you through it all.
Today, we’ll start with camera controls.
FYI – I use a Canon 550d/Rebel T2i – positions of switches may vary between models, but aperture/ISO etc. are on all cameras, so this guide will still explain what these controls do. ALSO – I will not go into every single mode/button – this guide is meant as a beginners guide, so I will be going over the functions that I use every day in my food photography.
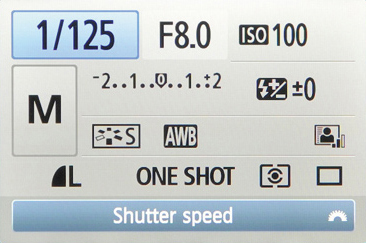
So, you get your hands on your new dSLR and you manage to switch it on. Then you’re confronted by a screen like this:
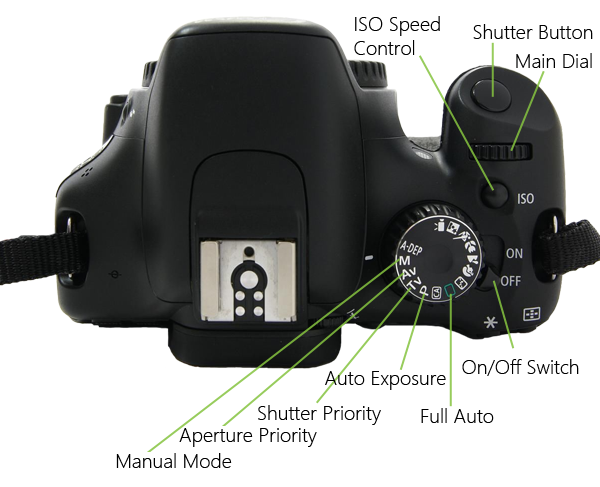
Before I go into what all those things mean, I’m going to explain the controls on the top of the camera, because even though you’ve switched it on, you might not have a clue what all those symbols mean either. (I know I didn’t!)
Shutter Button – Takes your photograph. Press the button halfway down to focus and then press the button fully to take the photograph.
Main Dial – Changes all kinds of things, depending on whether you are pressing another button with it, including Aperture and Exposure.
ISO Speed Control – This controls how sensitive your camera is to light – the sensitivity of your camera will also have an effect on the noise (graininess) of your images, more on that in later posts!
On/Off Switch – pretty self explanatory.
Now, onto the different modes on the top dial:
Full Auto – The camera decides your shutter speed, ISO and Aperture depending on your environment.
Auto Exposure – The camera controls the settings of ISO, Shutter Speed and Aperture to create the correct exposure. but you can manually override them.
Shutter Priority – You control the shutter speed, the camera determines the aperture.
Aperture Priority – You control the aperture, the camera determines the shutter speed.
Manual Mode – You control everything; the ISO speed, Shutter speed and Aperture, Exposure, Focus, Flash etc.
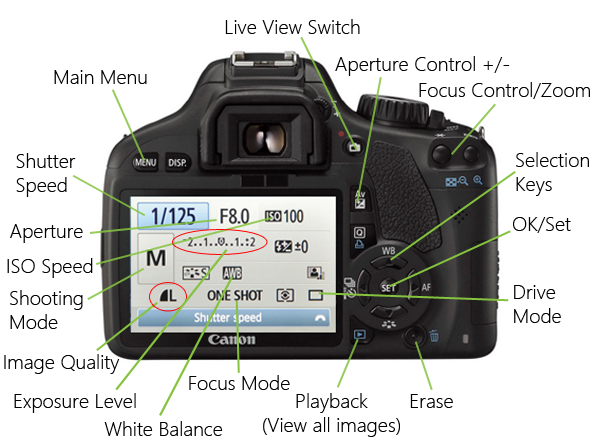
Now, you know what those symbols mean, we can go over the main controls on and around the screen. DON’T be alarmed by how many labels there are on this image. I’ll go through every one and explain what they do 🙂
Firstly, the buttons:
Main Menu – Takes you to a screen with many different options – to be honest you probably won’t need a lot of them. There all kinds of things to do with movies, camera set-up, playback, shooting, but I most frequently use the “Erase Images” and “Image Quality” settings.
Live View Switch – This switches the screen between the image you see above, or what you are trying to photograph – this is completely down to personal preference, but I don’t tend to use it.
Aperture Control – When held down the “F8.0” (for example) will be highlighted in blue, you can then scroll the main dial on the top of the camera right or left to change the Aperture.
Focus Control/Zoom – Most of the time you will use this as your focus control, not zoom. This doesn’t zoom the lens, it zooms in on images in playback and other features. When you click this button you will get a screen with a number of points on – you then select which point you want to use as your focus point and press the shutter button halfway down to set it.
Selection Keys – Enables you to move up, down, side ways depending on what screen you’re on.
OK/Set – Allows you to set certain things; for example, if you want to change your ISO, you select which ISO you want then click “set”.
Erase – Erases the image that you are currently viewing in playback.
Playback – You press this button to view the image you’ve just taken. If you want to view all images, you use the Zoom/Focus Control buttons to zoom out – then all the photos on your card will be shown in a grid.
Now, onto the screen:
Shutter Speed – This is how long your shutter stays open when you take a photo.
Aperture – This controls how much light is let into your camera.
ISO – This controls how sensitive your camera is to light.
Shooting Mode – This just shows you what mode you have selected on the top dial.
Image Quality – This shows you what type of image (JPEG/RAW) and the quality you have selected (large, medium, small etc.)
Exposure Level – This bar is KEY in manual shooting! Loads more on that in later posts, but this bar has a moving dash which moves up and down the scale depending on how dark or light it is in the surrounding environment and your shutter speed setting. It shows you how bright or dark your image will be. The aim of the game is to have the moving dash slap bang in the middle.
White Balance – Cameras have a variety of settings for white balance, depending on the weather – these include: cloudy, daylight, …. Auto (AWB) – If you choose cloudy, the camera will compensate by adding warmth to an image. However, I find that the camera over-compensates and you end up with really orange (or blue) images, so I always leave mine in AWB – you can change the white balance later on in Lightroom/Photoshop.
Focus Mode – This is how your camera focuses on an object. The options are One-Shot focus (Best for food photography as the objects are still), AI Focus, AI Servo and Manual focus. AI Focus and Servo are how your camera focuses with moving objects. AI Servo tracks the object which is moving, AI Focus switches between One-Shot and AI Focus depending on what your object is doing. Manual Focus is where you focus the lens yourself. I shoot in manual mode, but the one thing I rely on the camera to do is focus – manual focus means you have to twist the lens focusing ring until the object looks sharp in the viewfinder – I don’t trust my eyesight enough to do this! For food photography I leave my camera in One-Shot – the camera focuses once on whichever focus point you chose, then you’re ready to shoot.
Drive Mode – This setting is for how many photos you want your camera to take at any one time. I normally have this set to continuous, meaning when I press and hold the shutter button, it will continuously shoot – I normally take about 5 in a row. If you leave it in single shot, when you press the shutter button it will only take one photo. To take another one you will have to press the shutter button halfway down to focus again. Most cameras also have a self-timer setting, allowing you to press the shutter button and then have 10 seconds (for example) to get in position before the photo is taken, those modes can also be found here.
SO…
Those are all our camera buttons and controls. I know this is a really lengthy post, but I hope that I’ve explained every function that I use daily in a way that you can understand. Next week we’ll be moving into different camera modes; Full Auto, Aperture Priority, Shutter Priority and starting to look at Manual. Manual mode will run over into a few posts as there are lots of bits you need to bring together to get your killer images!
Your “homework” for this week is to get your camera out and play around with some of those buttons! Try taking a few shots in Full Auto and have a look at the screen to see what the camera does to correctly balance your image. Go into different rooms, with different lighting to see how it affects the camera settings – have fun! and remember Practice makes Perfect!!


